The below steps explains on how to transfer data
from legacy system to SAP via IDOC using LSMW tool.
Step 1: Tcode: LSMW.
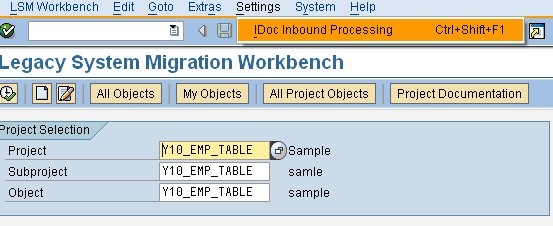
Click on settings à IDoc Inbound Processing.
In the below screen maintain the File port
(WE21), Partner Type (LS) and Partner Number (WE20).
Design the Partner:
a. Create custom basic type,
message type using tcode WE30 and WE81 respectively.
b. Link message type and basic
type using tcode WE82.
c. Create logical system using
tcode BD54.
d. Create an inbound function
Module to link it to process code via We42.
e. Maintain the function Module
through BD51.
f. Link the Basic Type, Message
Type and function module using tcode WE57.
g. Maintain partner profile in
WE20 for partner RECEIVED.
Create a project, sub project and object as
shown tcode LSMW. Multiple process steps will now be available. Click on the
first step and execute again. The first process step is Maintain Object Attributes.
Step 2: Maintain Object
Attributes
Select the radio button IDoc and give the
corresponding Message type and Basic Type.
In this scenario, Basic Type: Y10_EMP_TABLE and
Message Type: Y10_EMP_TABLE are created for this purpose. Save and go back.
Step 3: Maintain Source
Structures
Create a source structure with any name as shown
below by clicking on the Create button in application toolbar. Save and Go
back.
Step 4: Maintain Source Fields
Create an input structure. This structure should
be same as the input file which has to be uploaded from either legacy or
application. There are multiple ways to create a structure. Fields can be
created one by one or all at a stretch by using the buttons Create Field or Table Maintenance respectively. Save and Go back.
Step 5: Maintain Structure
Relations
Maintain the structure relation by using the
button Relationship in application toolbar.
By default the structure relation exist between
the IDoc segment and the source structure.
Step 6: Maintain Field
Mapping and Conversion Rules
Link the source fields to IDoc segment fields by
clicking on the button Source field in application toolbar. Save and go back.
Step 7: Specify Files
Specify the location of the input file.
In this scenario, the input file is placed in
the presentation server.
While specifying the file, specify the separator
and other relevant parameters as required by clicking on Create button in
application toolbar.
Step 8: Assign Files
Assign the input file to the source structure
created by using the button Assignment .
Save and go back.
Step 9: Read and convert the
data
The below screen shot displays the number of
records read from the input file.
The below screen shot shows the number of
records converted to source structure format from the input file.
Step 10: Start IDoc
Generation
The IDoc gets generated with the data available
in the converted structure from the above step. Once the IDoc is generated, the
below message is obtained.
Step 11: Start IDoc
Processing
IDoc gets Processed in this step. The IDoc is
processed based on the code written in the inbound function module.
The first screen is displayed in the screen
would be almost same as WE02/WE05.
The Logical system (Partner) and partner type specified in step1 appears
here.
Execute it.
The Message above shows that the document is
posted. Kindly check the relevant table for data update
Step 12: Create IDoc Overview
To have a look at the Control record, Data
Record and Status Record execute this step. The screen obtained in this step is
same as WE02/WE05.
Step 13: Start IDoc Follow-Up
In case of any error/Warning use this step to
reprocess or follow up.
The above are the steps best describing to post
IDoc using LSMW tool. Using this method, large volume of data can be posted to
SAP.


1 Comments
Thanks for sharing this Information, Got to learn new things from your Blog on SAP SF.
ReplyDeleteSAP SF
Call us at eight one two two two four one two eight six.